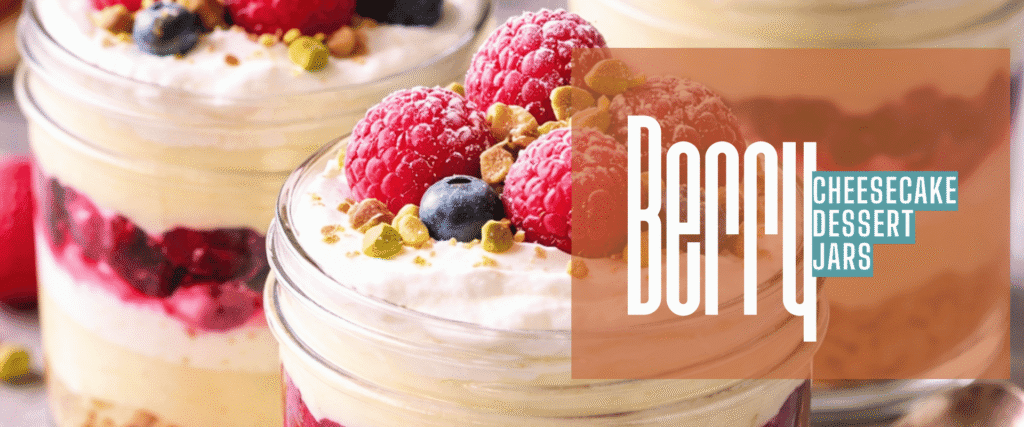
Berry Cheesecake Dessert Jars
This dessert was created because I wanted something that felt a little special without turning my kitchen upside down.
Berry cheesecake jars are one of those desserts that look impressive but are secretly very simple. No baking. No water baths. No worrying if the center is set. Just layers of creamy cheesecake filling, fresh berries, and a buttery graham cracker base that comes together in minutes and actually holds up in the fridge for days.
This is the kind of dessert I make when I need something reliable. Something I can prep ahead. Something that tastes even better after it’s been chilled for a while. And something everyone immediately asks about when they open the fridge.
Why These Berry Cheesecake Jars Work So Well
What makes these jars different from a lot of no-bake desserts is the balance.
The filling is rich without being heavy. The berries add freshness and a little tartness so it never feels overly sweet. And the graham cracker layer gives it that classic cheesecake texture without the stress of baking.
They’re also:
- Completely no-bake
- Easy to portion
- Perfect for make-ahead desserts
- Great for parties, holidays, or just keeping something sweet in the fridge
I’ve made these for family gatherings, casual dinners, and even just as a midweek treat when I wanted something comforting but not complicated.
Ingredients
For the Graham Cracker Layer
- Graham cracker crumbs
- Melted butter
- Granulated sugar
For the Cheesecake Filling
- Cream cheese, softened
- Powdered sugar
- Vanilla extract
- Whipped topping or freshly whipped cream
For the Berry Layer
- Fresh berries (strawberries, blueberries, raspberries, or a mix)
- Optional: a little sugar if your berries aren’t sweet
Exact measurements can be adjusted based on how many jars you’re making. This recipe is flexible and forgiving, which is part of why I love it.
How to Make Berry Cheesecake Jars
1. Make the Graham Cracker Base
In a small bowl, mix the graham cracker crumbs, melted butter, and sugar until the texture looks like damp sand. Spoon the mixture into the bottom of each jar and gently press it down to create an even layer.
This base gives structure to the dessert and keeps the layers from blending together.
2. Prepare the Cheesecake Filling
In a mixing bowl, beat the softened cream cheese until smooth and creamy. Add the powdered sugar and vanilla extract, then mix again until fully combined.
Gently fold in the whipped topping until the mixture is light and fluffy. The goal here is smooth and airy, not dense.
3. Prepare the Berries
Wash and dry the berries. If using strawberries, chop them into small pieces. If your berries are tart, you can lightly toss them with a little sugar and let them sit for a few minutes to release some juices.
4. Assemble the Jars
Layer the dessert in this order:
- Graham cracker base
- Cheesecake filling
- Berries
Repeat the layers until the jars are full, finishing with berries on top.
Each jar should have visible layers — that’s part of the appeal.
5. Chill Before Serving
Cover the jars and refrigerate for at least 2 hours before serving. Overnight is even better.
Chilling allows the flavors to blend and the texture to firm up, making the jars easier to eat and even more flavorful.
Make-Ahead & Storage Tips
These berry cheesecake jars are ideal for making ahead.
- Store covered in the refrigerator for up to 3 days
- The texture actually improves after the first day
- Keep them tightly sealed so the cheesecake stays fresh
If you’re making these for a party, you can assemble them the night before and simply garnish with extra berries right before serving.
Variations You Can Try
Once you’ve made these once, it’s easy to customize them:
- Mixed Berry Cheesecake Jars: Use a blend of berries for more depth
- Chocolate Berry Version: Add a thin chocolate layer or drizzle on top
- Lemon Cheesecake Jars: Add lemon zest to the cheesecake filling
- Cookie Crust Swap: Use crushed vanilla wafers or shortbread cookies instead of graham crackers
This recipe is very adaptable, which makes it a great base to keep in your rotation.
A Quick Note on Texture
If you prefer a firmer cheesecake layer, chill the filling for about 20 minutes before assembling. If you like it softer and more mousse-like, assemble right away.
Both versions work — it really comes down to personal preference.
Frequently Asked Questions
Can I use frozen berries?
Fresh berries are best for texture, but frozen berries can work if thawed and drained very well.
Can I make this without whipped topping?
Yes. You can use homemade whipped cream instead. Just whip heavy cream until stiff peaks form and fold it into the cream cheese mixture.
Do these travel well?
Yes, especially if kept chilled. They’re one of my favorite desserts to bring along because they’re already portioned and mess-free.
Final Thoughts
Berry cheesecake jars are one of those desserts that quietly become a favorite. They’re simple, dependable, and always feel like a treat. No oven. No stress. Just layers of flavor that come together easily and stay good for days.
This is the kind of recipe I come back to again and again, especially when I want something that feels homemade without requiring a full afternoon in the kitchen.
If you’re putting together a menu or just want another crowd-pleasing bite to serve alongside this dish, this one is always a hit:
➡️ Salted Caramel Apple Pie Bars
Looking for something new to make? Start here.
Shop My Kitchen
These are the kitchen essentials I use regularly and highly recommend.
Silicone Cooking Spatula Set
Stainless Steel Knife Set
Premium Heat-Resistant Ground Beef Smasher
Multi-Purpose Stainless Steel Scraper/Chopper
KitchenAid Ribbed Soft Silicone Oven Mitt 2-Pack Set
The Original Pro Chopper – Vegetable Chopper and Spiralizer
Silicone Baking Mat (3-Pack), Reusable Non-Stick
Stainless Steel Measuring Cups & Spoons Set (10-Piece)
Pyrex Essentials 3-Piece Glass Mixing Bowls Set
Affiliate Disclosure:
Some links may be affiliate links. If you make a purchase, I earn a small commission — with no added cost to you.